

How To Add A Sent Folder In Outlook
Having access to all your mails on Outlook is meant to be normal as information technology helps you lot to locate important data. Withal, it becomes frustrating when the "Sent" folder of your Outlook gets missing or inaccessible.
In this commodity, you lot volition larn iv major tips you can employ in fixing this problem of sent folders missing. They are applied measures that you tin rely on, even if y'all are not a tech skilful. So, get on with it!
In this article
What to Do When Outlook Sent Folder Gets Missing
And so you open your Outlook and your sent folder is missing! What exercise you lot do? Outset, you need to calm down, so try the tips discussed beneath and you can be certain that one of them will successfully set up the problem at hand.
Tip ane: Enable Saving Sent Items
The start tip is to ensure that you tick the "checkbox" for saved copies of "Sent Items" folder letters. This ways that yous accept to enable the choice to e'er salve a copy of any bulletin you send, in the folder for sent items.
To enable this checkbox, follow the steps below:
Step ane. Click on "File" > "Options"
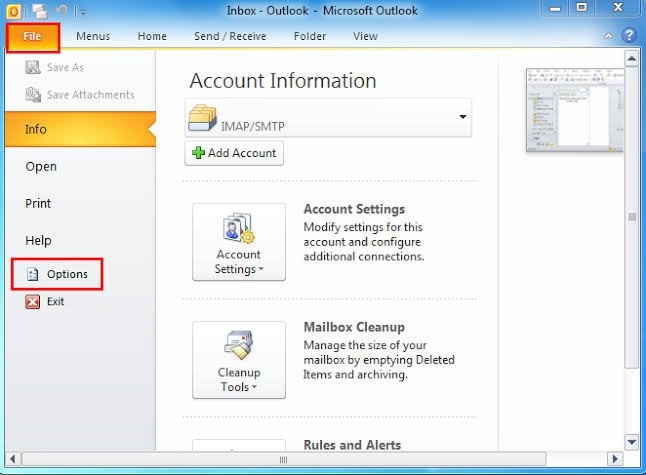
Stride 2. Choose "Mail"
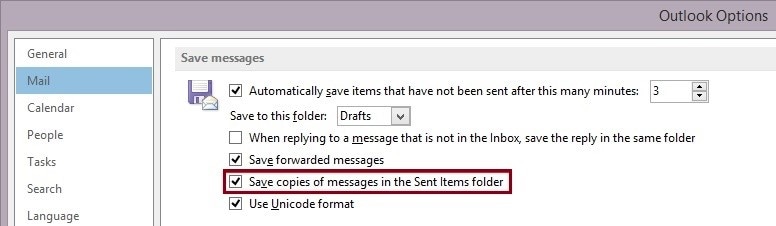
Step 3. Go downwards to the section marked "Save letters". Ensure you cheque the checkbox near "Salve copies of messages in the Sent Items Folder"
Step 4. Click "OK" to cease.
Tip 2: Disabling Cached Fashion
The Cached Mode is one of two modes through which yous can connect Outlook to your Exchange business relationship, the other beingness Online Manner. The Cached Mode enables you to access emails and make changes even when you are not online since they are locally saved on your hard drive as OST files. Every bit great every bit information technology sounds, the Cached Mode may need to be disabled if you are to gain access to your sent binder. This is because information technology requires a larger disk space when compared to the Online Way. More importantly, the reason you cannot perform a search in your emails is because of the Cached Fashion.
Thus, follow the steps beneath to disable cached substitution fashion and utilise the online mode to see if you can find your missing sent folder:
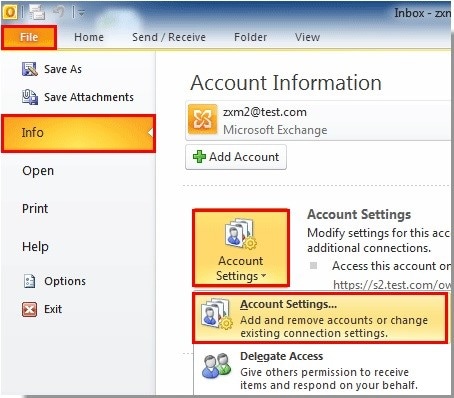
Step 1. Go to the dialog box for "Account Settings". To access this,
For Outlook 2010 and 2013, follow the path: "File" > "Info" > "Account Settings" > "Account Settings".
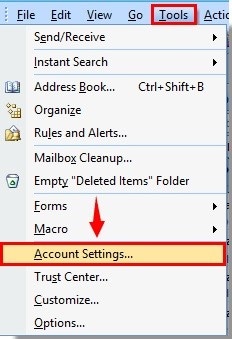
However, if you are using Outlook 2007, become to "Tools" > "Account Settings"
Stride 2. Now that yous are in the dialog box of "Account Settings", yous can choose the exchange business relationship whose cached mode you want to disable. In one case you do this, get under the "Email" tab and select "Modify".
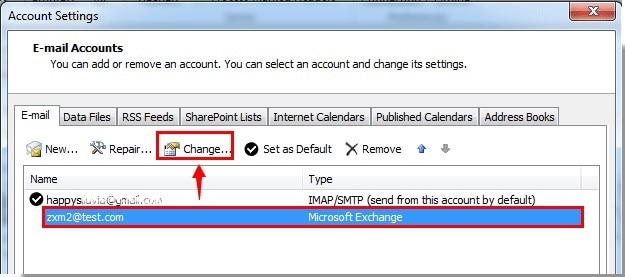
Step iii. A dialog box for "Change Account" will appear. Go to the box named "Use Buried Exchange Mode" and click to remove the "check" sign.
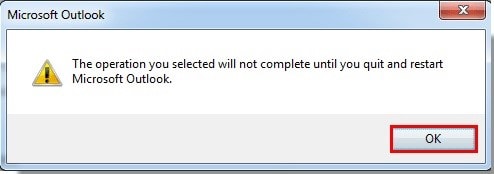
Step 4. Click the "Next" selection.

Step 5. You will run into a pop-up "Microsoft Outlook" dialog box again, choose "OK".
Step half dozen. Start Outlook again so that all your changes will be applied.
Tip iii: Repairing the Outlook Profile
You lot may need to perform a repair of your Outlook profile to retrieve the missing sent folders. To achieve this, you can either use Outlook'due south inbox repair tool or employ a professional person repair tool such every bit the Stellar Outlook Repair tool. The utilize of both options will be discussed below:
ane. Scanpst Tool
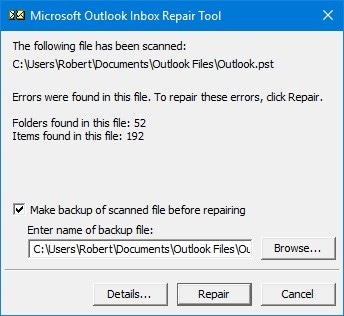
This is also called Outlook's Inbox Repair Tool. It is important for manual repair of any problems facing your Outlook profile. One time at that place is abuse involving this .pst, then Outlook generates errors, ane of which is the missing sent binder. Scanpst is an already-installed office of your Outlook, hence, all y'all need to practise is to locate it on your Outlook version, follow the steps below, and repair your corrupt Outlook file:
Locate the .pst file you need to scan for repair. For Outlook 2007 and before versions, the default PST location is:
C:\Users\%username%\AppData\Local\Microsoft\Outlook\
For Outlook 2019, 2016, 2013, 2010, and Office 365, follow this path:
C:\Users\%username%\Documetns\Outlook Files\
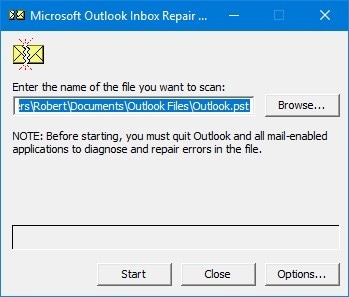
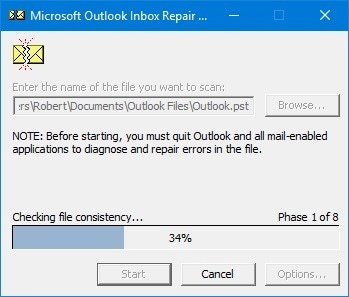
At present, click the "Kickoff" button to enable the repair tool to scan the location. The length of time Scanpst volition take to practise this assay depends on how large the binder size is
You lot will be presented with a written report on the nature of the error and the extent of corruption responsible for your sent binder being inaccessible. You tin can click on "Details" if you wish to get more information on this.
Move on to repair. However, ensure y'all support all your important PST files before clicking on "Repair".
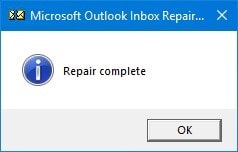
>One time the repair is completed, select "OK", then shut Outlook and restart it.
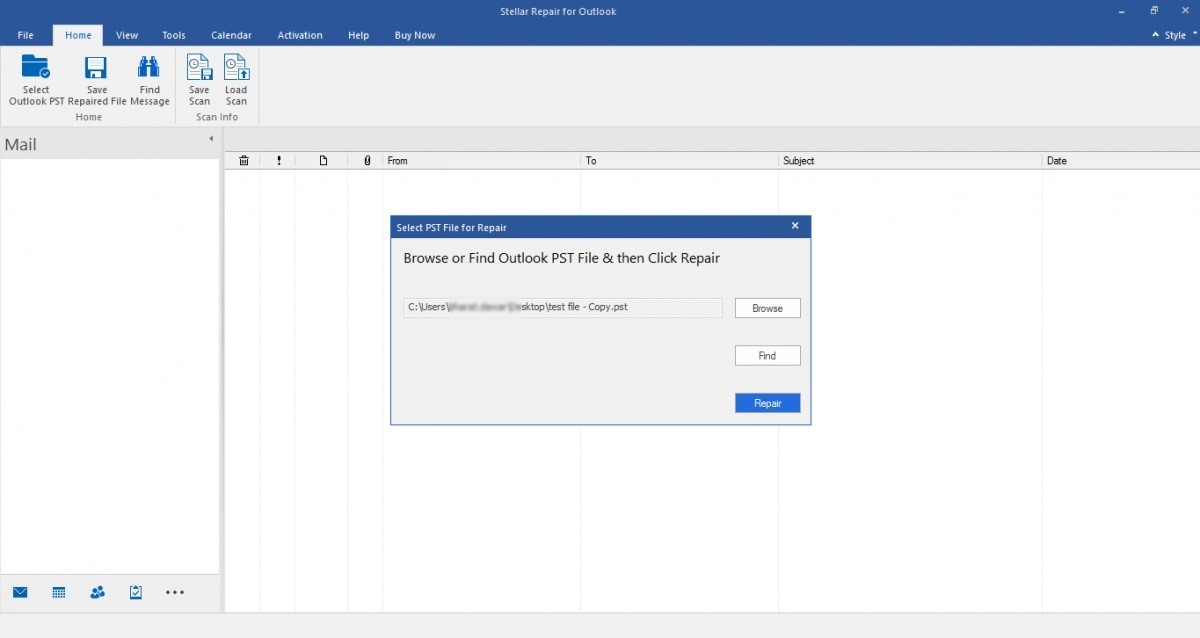
ii. Stellar Outlook Repair Tool
Scanpst is limited in certain ways, which makes it necessary for you to employ the use of 3rd-party repair software to set your corrupt Outlook PST files. The Stellar Outlook Repair tool is such a software that tin exceed the limitations of Scanpst as it repairs severely corrupted PST files, it recovers items that have been deleted or are missing and the repair procedure is like shooting fish in a barrel and straightforward. Meanwhile, with Scanpst, you may demand to carry out the repair procedure several times to get your desired result, a process that can be lengthy.
Having established the need for the Stellar Repair tool for Outlook, y'all tin now download, launch it and follow these steps to repair your corrupt Outlook profile:
Step ane Add Decadent File
Add together the corrupt .pst file onto the interface of Stellar Repair for Outlook by using the options "Find" or "Browse". These options volition lead y'all to the location of the corrupt PST file
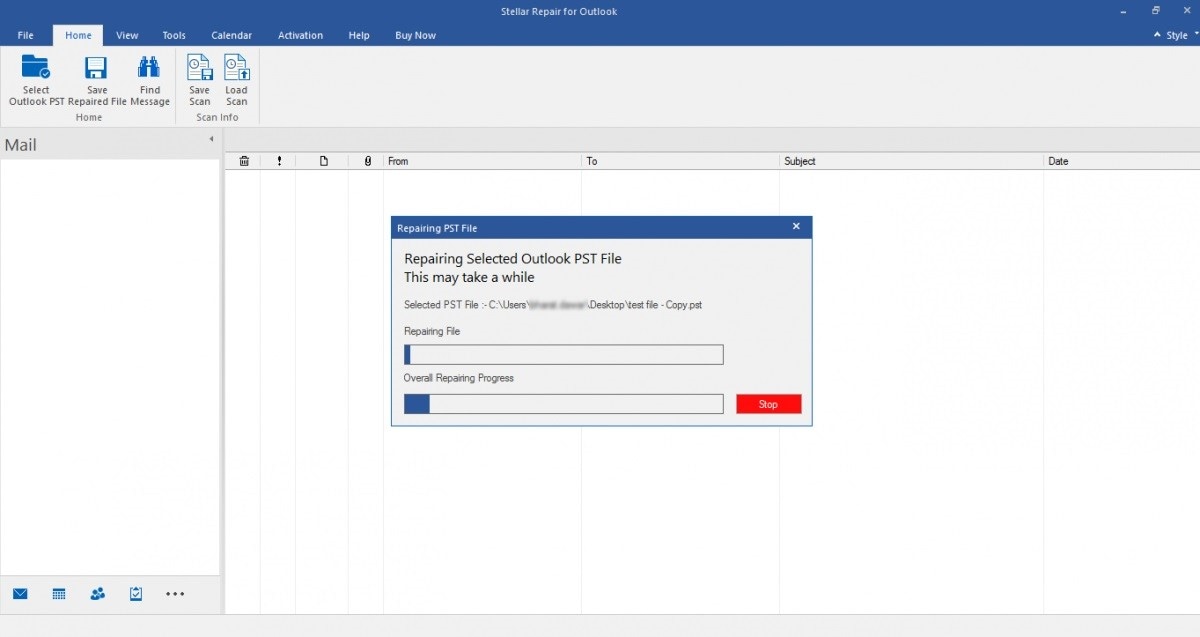
Pace 2 Repair File
Click the "Repair" button in the mini window on the interface to begin the repair of your Outlook files. You will see a progress window on the interface.
Step iii Preview and Relieve File
Here, you lot have the choice of viewing the repaired Outlook files. The files are displayed in the preview window every bit follows: the list of files on the left pane, content in the eye, and details on the correct.
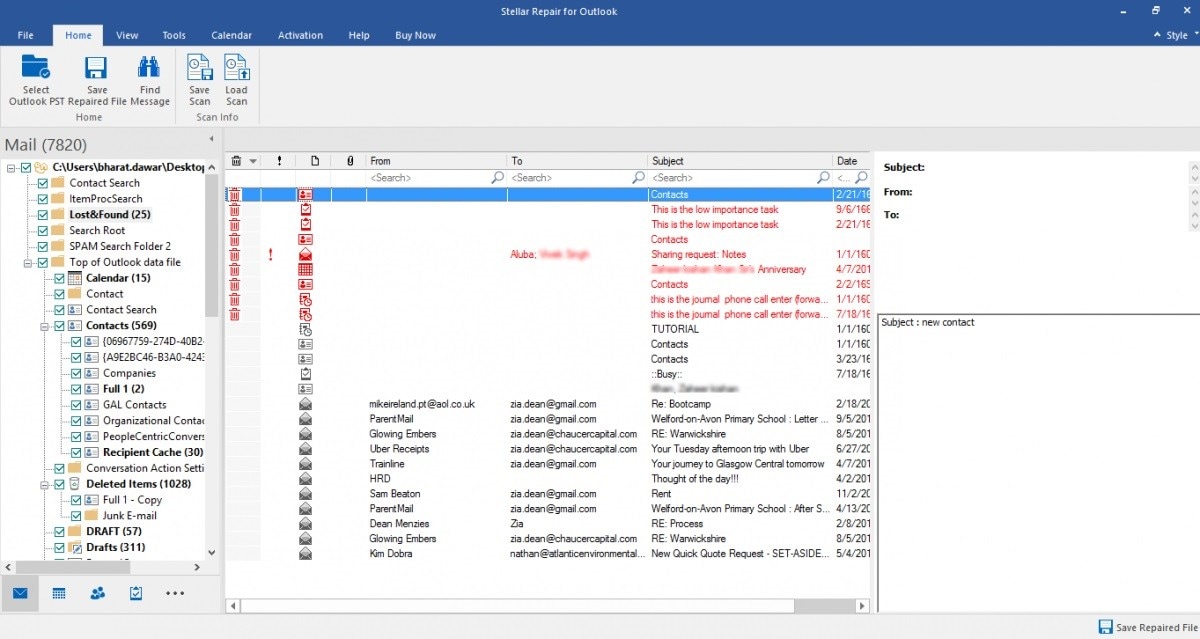
Once y'all are satisfied with the content of your repaired and recovered files, just click on "Save Repaired File" on the "Home" menu.

Tip 4: Recreating the Outlook Profile
The final tip is to create a new profile for Outlook, completely starting afresh. To do this, follow the steps below:
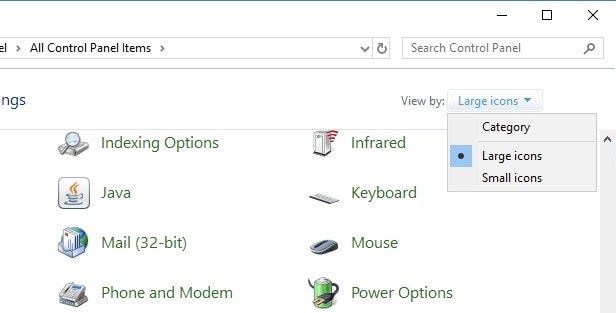
Step 1. Close Outlook. Adjacent, launch "Control Panel" and from the listing under "View by:", choose "Large icons"
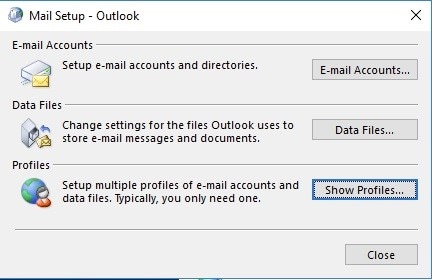
Stride 2. Choose the icon representing "Mail (32-flake) and from here, select "Bear witness Profiles…"
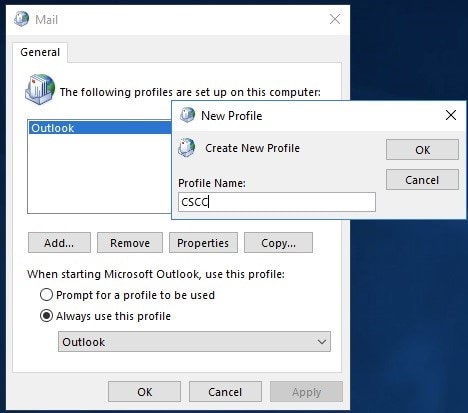
Pace 3. Choose to "Add…" a new contour, then requite your new contour a name of your choice. Set information technology up by post-obit the prompts that appear.
Step 4. Go to "Always use this profile" and under this tab, choose your new profile from the list, as the default.
Pace five. Re-open Outlook. Notation that restarting may accept a while on the Desktop Client because of the fresh downloads that are done as a necessity for your newly created profile.
The Bottom Line
With the tips explained to a higher place, you should be able to prepare the problem of your Outlook Sent Folder Missing. If i solution does not work for your peculiar example, some other will. And so, don't give up until you lot have tried information technology all.
Other popular Articles From Wondershare

How To Add A Sent Folder In Outlook,
Source: https://repairit.wondershare.com/email-recovery/outlook-sent-folder-missing.html
Posted by: rosadotorty1998.blogspot.com
0 Response to "How To Add A Sent Folder In Outlook"
Post a Comment